
 Save
Save
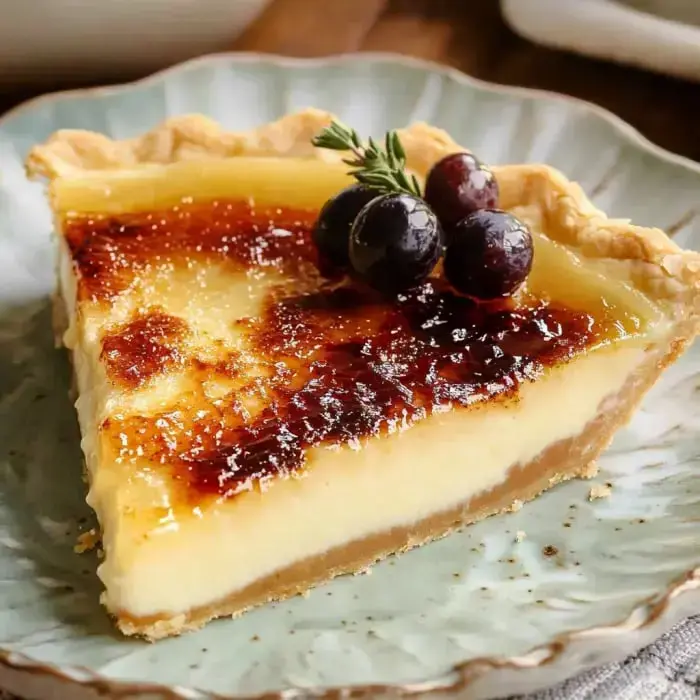
I'm so excited to let you in on my top dessert combo ever! This blend of French custard and buttery handmade crust is simply amazing. After tweaking this treat in my own cooking space, the creamy vanilla inside and that breakable sugar layer on top always gets my dinner guests talking. It's now what everyone asks me to bring to gatherings.
What Makes This So Good
You'll fall head over heels for this pie, I promise. It's got that fancy restaurant feel but with all the warmth of something baked at home. Breaking through that hardened sugar into the soft custard underneath? It's absolutely incredible! My followers can't believe how easy it is to whip up something that looks this fancy. It's just what you need when you want to wow everyone without slaving away all day.
Your Grocery Run
- Pie Dough: My mealy dough version works wonders since it stays crisp throughout.
- Heavy Cream: Splurge on premium quality for truly remarkable results.
- Egg Yolks: They're the secret behind that velvety smoothness we want.
- Vanilla Bean Paste: This little gem transforms the entire flavor profile.
- Granulated Sugar: Needed both inside the filling and for that stunning crunchy top.
- Salt: A tiny bit enhances all the other flavors wonderfully.
Creating That Dream Crust
- Cool Environment Matters
- I always keep my cooking area chilled when working with pie dough. Get your dough ready and find your favorite 9 inch dish before we start. Roll with light movements until you've got an 11 inch circle about 1/8 inch in thickness. Don't skip measuring that circle size it really helps give that store bought look. Gently place the dough over your rolling pin to move it to the dish. Here's my top tip lift and press the dough into corners without pulling it or you'll end up with shrinkage during baking. Take your sweet time on those fluted edges I like mine looking like small ripples. Use your fork to poke holes all over the bottom about an inch apart. This stops any air bubbles from puffing up.
- Rest Time Is Key
- Stick your finished crust in the fridge for at least 15 to 20 minutes as this helps the gluten relax and prevents your crust from pulling back. During this wait time get your oven going at exactly 425°F if you own an oven thermometer now's the time to use it exact heat really counts here. Cut some foil big enough to cover your pie with extra hanging down the sides. After chilling press the foil down onto your dough and fill completely with pie weights or beans. Don't go light on these weights they're crucial for a flat base.
- Pre Baking Steps
- Put your weighted crust on the middle shelf and bake for exactly 20 minutes. You want just a hint of gold on those edges. Carefully take out all the weights and foil then let your crust cool on a rack for another 20 minutes. While cooling turn your oven down to 350°F. A properly pre baked crust should look dry to the touch and feel firm but not fully browned all around yet.
The Crowning Touch
After your pie sits in the fridge all night comes the best part! Dust sugar evenly across the top surface. Turn on your kitchen torch and watch as the sugar bubbles and turns amber it's totally mesmerizing! Let it sit for a minute to harden before cutting. Don't have a torch? Your oven's broiler can do the trick just watch those crust edges closely.
Dishing Up Your Creation
Nothing beats that awesome snap when you break into the sugar coating! I think it tastes best with some fresh berries or a dollop of whipped cream on the side. Sometimes I'll add a little caramel drizzle on top when I'm going all out. Seeing everyone's faces light up after their first taste makes all the steps totally worth it.
Storage Tips
Your pie will last nicely in the fridge for about two days though the sugar top will get soft over time. Need to prep ahead? You can freeze it without the sugar layer if you wrap it properly. Just thaw it when needed and add that fresh sugar coating right before serving. That newly torched crunch just can't be beaten!
My Pro Tips
Mix that custard slowly and carefully for the smoothest result. Always make sure your crust is baked enough before pouring in the filling nobody wants a wet bottom! Try using really fine sugar for the prettiest golden top. If you go with the broiler method keep your pie far enough away we want golden caramel not charcoal!

Recipe Q&A
- → What do I use without a torch?
- Your broiler works too! Cover the edges of the crust with foil, pop it about 6 inches under the broiler, and keep a close eye as the sugar bubbles. Take it out quickly when done!
- → How early can I prepare it?
- You can blind-bake the crust and freeze it for two months. The whole pie lasts in the fridge for up to 2 days but loses its crunchiness with time.
- → Why pour cream into eggs slowly?
- Slowly add warm cream while stirring—this stops the eggs from scrambling. Gentle mixing gives your custard that smooth texture.
- → When is the pie completely baked?
- After about 30-35 minutes, the center should wiggle just a tiny bit. It'll firm up as it cools and when you chill it overnight.
- → Can I prep garnishes a few days ahead?
- Absolutely! Sugared herbs and berries stay fresh for 2-3 days in an airtight container once thoroughly dry. Add silica packs for extra freshness.